
Rachel Kendall Events was not solely inspired by my love of organization, planning, to-do lists, and the joy surrounding celebrations. When I thought about what I would enjoy most in life it was all those things plus being able to spend time doing multiple D.I.Y crafts! I am going to work my hardest to scatter in D.I.Y blogs along with the write-ups of the inspirational events I am lucky to be a part of. First on the list is the new fad, string art.
This D.I.Y craft first got introduced to me when I saw a friend make one for her soon-to-arrive baby boy’s room about a year ago. This got me thinking what a fun, easy, and meaningful gift it could be for multiple occasions, as well as a perfect décor touch for any type of event! You can personalize this craft in so many ways, whether it be the background material & color you chose, the color or consistency of the string, and of course the image. For my first attempt at this project, I decided to make a pink heart on a white wooden background to match my other friend’s soon-to-arrive baby girl’s room. I knew this design would fit into the room my friend was creating for this princess and it would be a lovely personalized addition! And I just wanted an excuse to try one out 😉 My equally, if not more, crafty sister assisted me with the project and took the beautiful pictures below to document our process.
I hope you enjoy and please do contact me or tag Rachel Kendall Event if you use this tutorial to make your own string art masterpiece!
Step #1: Collecting Your Materials
One of the best aspects of this project is the materials you need are minimal and you probably have most of them at home, especially if you’re a crafter. If not, take one trip to your nearest craft store (A.C. Moore, Michael’s, or Hobby Lobby) and you will get mostly everything you need.
For my project, I went to A.C. Moore and purchased a 9 in x 9 in pine wooden background. I also picked up “DecoArt Americana Décor Outdoor Living Paint” in Picket Fence White and Pink knitting yarn. I already had a hammer, printer paper, nails, and blue painters tape at my house to use.
Materials Needed:
– Blue painters tape
Step #2: Paint Away!
Now take your background and paint away with whatever paint/stain/etc. you have planned out. I chose to paint it white to give that whitewashed look and to match the baby’s room design.

Step #3: Print or Draw Your Image!
While your background is drying you can take this time to figure out what type of image you want to create. Since I was doing a heart on a fairly smaller canvas, it was pretty simple to find a heart image online and print it on landscape format as big as possible. This ended up fitting just right centered on my background. If your project is bigger you might need to either print the image in segments and tape the pages together or take it to a Staples to print on bigger paper size. If you’re good at freehand drawing, go right ahead and then pat yourself on the back! I will admit right here and now, freehand is not one of my strengths and I will stick to my printer 😉
Step #4: Center, Tape, & Nail!
Once you have perfected your image center it on your background and tape it down enough that it will not move around but will not be stuck to your background. I only used a few pieces of tape for this, and if you’re worried about peeling off the paint or stain, painter’s tape might be a good call! Once you have the image secure, take your nails and start hammering away! I just used my thumb to make each nail equal distance from each other. Hammer the nails in enough that they are firm but don’t go crazy. One of my lessons from this first attempt is that the higher up the nail, the better since it will allow you to have more room to wrap the string around multiple times.

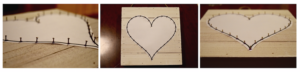
Step #5: Tear Away!
Once you have nailed all around your image you’re ready to tear your stencil away. Just grab one end and go! If any pieces of paper get caught around the nail take tweezers, or something similar, to get all paper possible off your project.

Step #6: String Time!
Now you’re finally ready for the fun! Take the end of your string and tie it to one of the nails. I started at the bottom point of my heart. Tie it a few times to ensure it will not come undone since that will cause your whole masterpiece to unravel if you lose tension while stringing. Once you feel you have a good knot in place then just go crazy from one nail to the next! One tip is to make sure not to go outside your image since that will cause the final product not to reflect the image you’re trying to create. I even outlined the whole heart after doing some random stringing to make sure I didn’t go outside the lines at all. There is really no rhyme or reason here, just keep going until you are happy with the outcome or there is no more room on your nails! This is why the next time I will not hammer my nails as much and/or I will make sure to get longer length nails.

Step #7: Tie off and step back!
Once you feel it looks perfect, or perfectly imperfect, go back to the nail you started from and tie off again, TIGHTLY! Remember to hold tension the whole time before letting go or your string might unravel. Don’t worry if it does, it happened a few times to us 😉 Then step back and admire your masterpiece!

** To add a special touch I wrote up a quote in Photoshop and tapped it to the back. (Apologies for this photo, it was the only one taken from an iPhone!)

Rachel
